Advanced load balancing scenarios with the new Azure Application Gateway for Containers
TLDR: Today we launched a new Layer-7 Load Balancer called Azure Application Gateway for Containers (official docs here) which is the first Azure managed traffic management service specifically designed for Azure Kubernetes Service. In the following I want to show you a couple exciting scenarios that are enabled by this new technology using Gateway API, e2e mTLS, Traffic Splits, Header based routing and fast failovers and compare the capabilities with the other existing options on Azure by showing you how to implement blue/green deployments using the new service.

For a while the existing managed ingress controllers for AKS were the Http routing addon (not supported for production) and the Application Gateway Ingress Controller — AGIC (known issues around update times, lack of relevant features) meant that most customer effectively had to run their own in-cluster ingress controller to implement any kind of reliable, scalable or secure traffic management.
Recently the number and quality of managed options for managing ingress to your containerized applications has improved:
- ) Istio addon. With Istio gateway and service mesh this will become a very exciting option for managing advanced traffic scenarios both into and inside your cluster.
- Application routing addon. With Nginx under the hood this managed ingress controller with dns operator for azure dns zones and KeyVault backing for your certificates this will probably become the default option for simple ingress scenarios.
- Application Gateway for containers. This new service supports Gateway API to define Kubernetes ingress networking concepts and offers exciting future capabilities while running outside of your cluster with the option to combine it with the Istio service mesh.
Before we take a closer look at the newest addition, there are also a couple other options which have proven valuable for certain scenarios and are already supported for production deployments:
- Azure Frontdoor can be used for routing public traffic and can be valuable if CDN and WAF capabilities are required. However you should be cautious with the private link option to route traffic into your cluster because of the NATing that will cause traffic imbalances in your backend. When you are not using private link and route to public endpoints then you have to find another way to secure your origins with service tags in the NSG and header based filter rules in your in-cluster ingress controller.
- Application Gateway V2 without AGIC can be a simple but reliable option to route traffic to your internal load balancers and is also the best choice when you need a WAF between your clients and your endpoints. In that case you also have to use deploy an in-cluster ingress controller with a set of (multiple) private load balancers in the backend pools to ensure even distribution.
- Cross region/ global load balancer can be deployed in front of a set of normal regional load balancers can help with the implementation of multi-region, instant failover and low-latency scenarios while also preserving the original client IP.
So, how does the new Azure Application Gateway for Containers (here also referenced as ALB) work? From a high level it looks a little bit like AGIC, that means it is made up the following components:
- A set of managed proxies that will be routing the traffic directly to a set of pods in your AKS cluster, which has to be part of the same VNET and configured to use Azure CNI to be directly addressable for the proxies.
- An operator that is listening for the desired state configuration for both the Gateway, Ingress and the Route objects and propagates the changes to the external control plane of the Azure Application Gateway for Containers.
- A Gateway Frontend that is providing a unique FQDN with a public ingress point that will be receiving public traffic and route it via the proxies to the configured pod (which will be selected by their corresponding service objects).
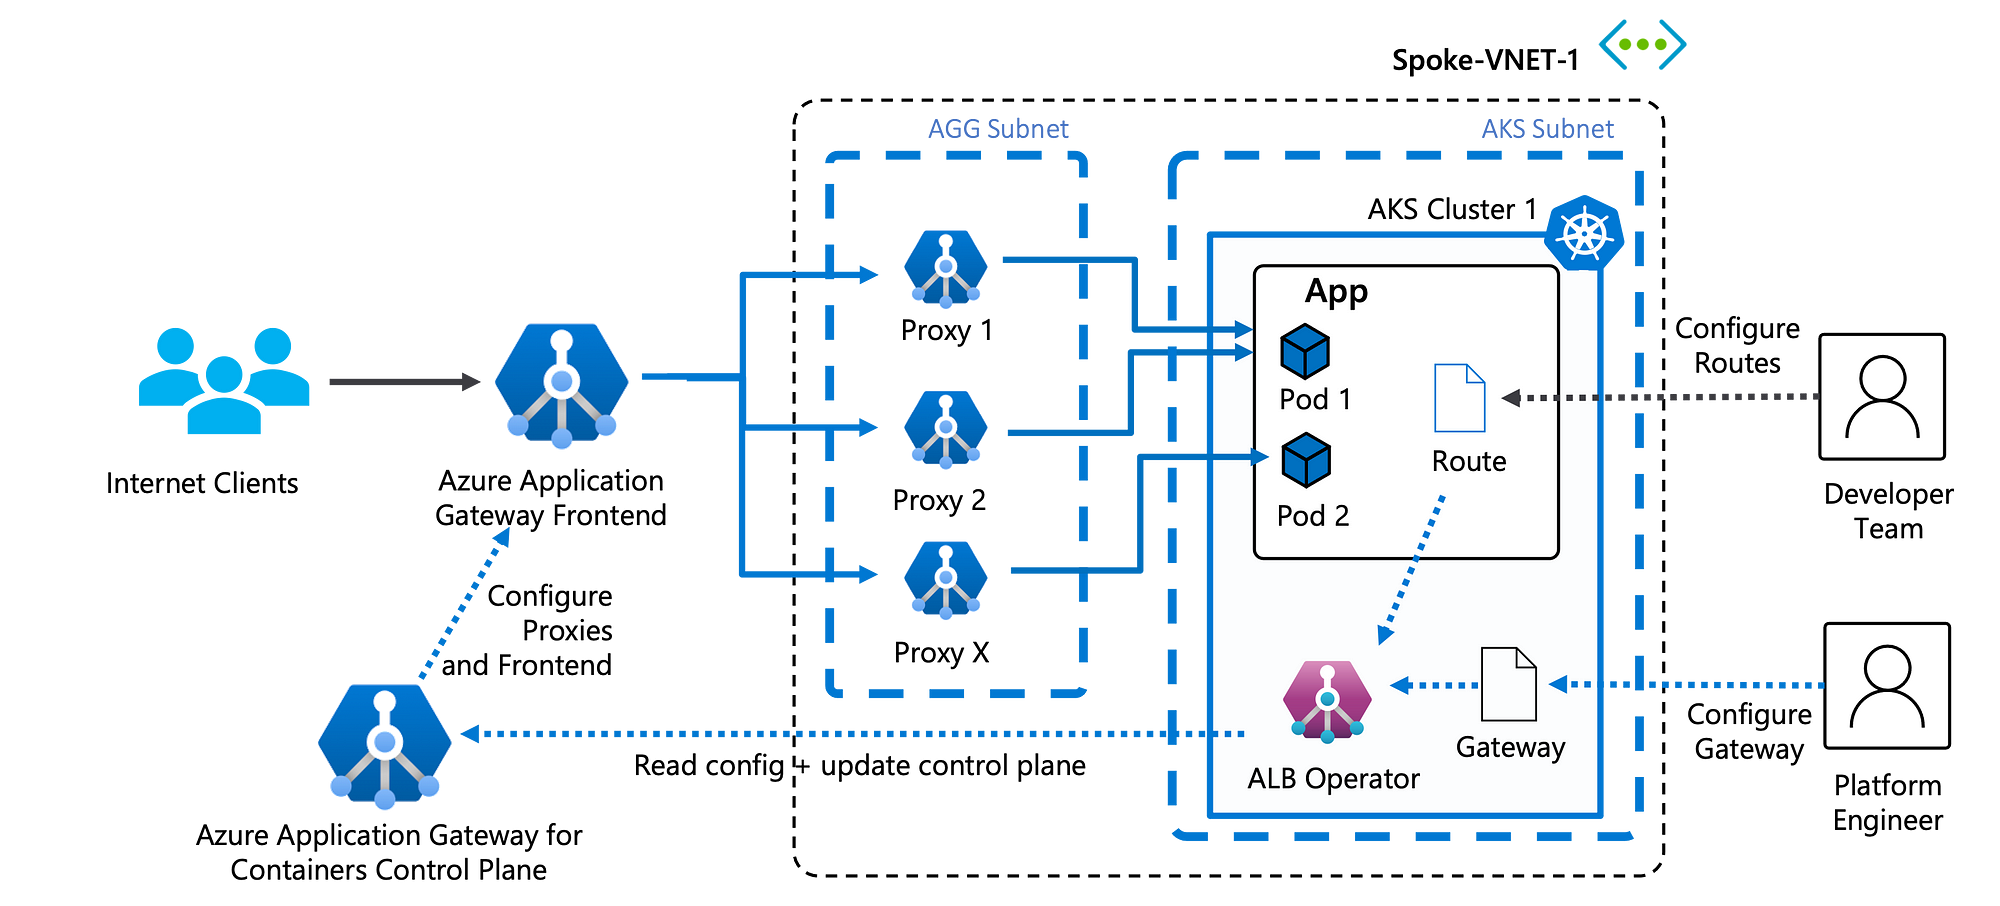
As a consequence there are a list of Azure and K8s services that are playing together to make the service work:
- A delegated dedicated subnet is required to be prepared (with at least /24 ip space) so that Azure can inject a set of proxies into that subnet. As a user you will never see, operate or directly interact with those proxies because they are exclusively managed by the ALB control plane.
- In your cluster you will need to run the ALB operator and create a Gateway object — which is corresponding to a ALB control plane and ALB Frontend.
- Since each Frontend is unique to each ALB and each ALB can (today) only have 5 Frontends. At this time you can only associate one ALB to one subnet which means the number of 5 different endpoints per cluster is something that you have to consider (for now).
- If you want your clients to connect to your custom FQDN you have to provide a CNAME record for your own DNS and attach it to the randomly generated FQDN that is created for each Frontend.
- You have to provide a managed identity with a matching workload identity and the correct permissions that will be used by the ALB controller to update the control plane.
- The traffic from the Frontend to your pods will be routed via the proxies and is going into your private network but is not encrypted by default.
- You can bring your own certificate to terminate TLS on the Frontend and ensure that the right certificate in the Gateway object definition.
- If you also want to ensure TLS between the proxies and your pods you also have to provide a backend BackendTLSPolicy with the right backend certificate (for example your Service Mesh) to be uploaded to the proxies.
Lets set it up and show it can be used. There is a tutorial available as part of the official docs so I will cut the guidance here short. First we have to assume you have a compatible cluster (with workload identity) with sufficient network configuration (azure cni) and dependencies (subnet delegation), register the new azure resource providers and install the new cli extension.
# Register required resource providers on Azure.
az provider register --namespace Microsoft.ContainerService
az provider register --namespace Microsoft.Network
az provider register --namespace Microsoft.NetworkFunction
az provider register --namespace Microsoft.ServiceNetworking

 # Install Azure CLI extensions.
az extension add --name alb

AKS_NAME="dzatc4" #cluster name
RESOURCE_GROUP="dzatc4" #cluster resource group
ALB="atc1" #alb resource name
IDENTITY_RESOURCE_NAME='azure-alb-identity' # alb controller identity

SUB_ID=$(az account show --query id -o tsv) #subscriptionid
ALB_SUBNET_ID="/subscriptions/$SUB_ID/resourceGroups/$RESOURCE_GROUP/providers/Microsoft.Network/virtualNetworks/$RESOURCE_GROUP-vnet/subnets/ing-4-subnet" #subnet resource id of your ALB subnet
NODE_GROUP=$(az aks show --resource-group $RESOURCE_GROUP --name $AKS_NAME --query "nodeResourceGroup" -o tsv) #infrastructure resource group of your cluster
NODE_GROUP_ID="/subscriptions/$SUB_ID/resourceGroups/$NODE_GROUP"
AKS_OIDC_ISSUER="$(az aks show -n "$AKS_NAME" -g "$RESOURCE_GROUP" --query "oidcIssuerProfile.issuerUrl" -o tsv)" # oidc issuer url of your cluster
Now we have to create the ALB, the ALB frontend, ALB identity, the federated credentials, grant it the correct permissions and install the operator itself with the right identity inside your cluster.
az identity create --resource-group $RESOURCE_GROUP --name $IDENTITY_RESOURCE_NAME
ALB_PRINCIPAL_ID="$(az identity show -g $RESOURCE_GROUP -n $IDENTITY_RESOURCE_NAME --query principalId -o tsv)"

echo "Waiting 60 seconds to allow for replication of the identity..."
sleep 60

az role assignment create --assignee-object-id $ALB_PRINCIPAL_ID --scope $NODE_GROUP_ID --role "Contributor"
az role assignment create --assignee-object-id $ALB_PRINCIPAL_ID --scope $NODE_GROUP_ID --role "AppGw for Containers Configuration Manager"
az role assignment create --assignee-object-id $ALB_PRINCIPAL_ID --scope $ALB_SUBNET_ID --role "Network Contributor"

az identity federated-credential create --name $IDENTITY_RESOURCE_NAME \
     --identity-name "azure-alb-identity" \
     --resource-group $RESOURCE_GROUP \
     --issuer "$AKS_OIDC_ISSUER" \
     --subject "system:serviceaccount:azure-alb-system:alb-controller-sa"

ALB_WL_ID=$(az identity show -g $RESOURCE_GROUP -n azure-alb-identity --query clientId -o tsv)

helm upgrade  \
  --install alb-controller oci://mcr.microsoft.com/application-lb/charts/alb-controller \
  --namespace azure-alb-system --create-namespace \
  --version 1.2.3 \
  --set albController.namespace=azure-alb-system \
  --set albController.podIdentity.clientID=$ALB_WL_ID
First we have to wait for the bootstrap controller to start and install the right CRDs in our cluster. After that has completed we wait for the ALB controller to initialise.
Next we are creating the namespace for your Gateway and create it. The idea here is that in contrast to the Ingress Controller object, which can only route traffic to services within the same namespaces we here have the option to route into services from multiple K8s namespaces from the same Gateway. That opens up a very interesting set of options for shared clusters with multiple developer teams.
kubectl apply -f - <<EOF
apiVersion: v1
kind: Namespace
metadata:
  name: $ALB-infra
EOF

kubectl apply -f - <<EOF
apiVersion: alb.networking.azure.io/v1
kind: ApplicationLoadBalancer
metadata:
  name: $ALB
  namespace: $ALB-infra
spec:
  associations:
  - $ALB_SUBNET_ID
EOF
In the Gateway object we will reference the ALB object by referencing the name of the ALB in Azure and the K8s namespace in the annotations. In the configuration of allowedRoutes we will define that we will be accepting routing defintions for this gateway from all namespaces that have the label `shared-gateway-access:true`.
kubectl apply -f - <<EOF
apiVersion: gateway.networking.k8s.io/v1
kind: Gateway
metadata:
  name: gateway-01
  namespace: $ALB-infra
  annotations:
    alb.networking.azure.io/alb-namespace: $ALB-infra
    alb.networking.azure.io/alb-name: $ALB
spec:
  gatewayClassName: azure-alb-external
  listeners:
  - name: http
    port: 80
    protocol: HTTP
    allowedRoutes:
      namespaces:
        from: Selector
        selector:
          matchLabels:
            shared-gateway-access: "true"
EOF
This interesting separation between Gateway and Routes also allows you to implement a very useful governance concept in which the platform engineering team will set up the Gateway, TLS and permissions and then the developer team can implement routes to their apps without the risk of breaking the network design of a shared environment.
Assuming all these configurations got propagated without error we will be able to retrieve the FQDN of our gateway.
kubectl get applicationloadbalancer $ALB -n $ALB-infra -o yaml

kubectl get gateway gateway-01 -n $ALB-infra -o yaml

fqdn=$(kubectl get gateway gateway-01 -n $ALB-infra -o jsonpath='{.status.addresses[0].value}')

echo $fqdn
The next step is to deploy the calculator app from the phoenix repo because it will allow us to demonstrate how to implement header based routing for implementing blue/green deployments.
helm repo add phoenix 'https://raw.githubusercontent.com/denniszielke/phoenix/master/'
helm repo update
helm search repo phoenix

AZURE_CONTAINER_REGISTRY_NAME=phoenix
KUBERNETES_NAMESPACE=calculator
BUILD_BUILDNUMBER=latest
AZURE_CONTAINER_REGISTRY_URL=denniszielke

kubectl create namespace $KUBERNETES_NAMESPACE
kubectl label namespace $KUBERNETES_NAMESPACE shared-gateway-access=true

helm upgrade calculator $AZURE_CONTAINER_REGISTRY_NAME/multicalculator --namespace $KUBERNETES_NAMESPACE --install --create-namespace --set replicaCount=2 --set image.frontendTag=$BUILD_BUILDNUMBER --set image.backendTag=$BUILD_BUILDNUMBER --set image.repository=$AZURE_CONTAINER_REGISTRY_URL --set gateway.enabled=true --set gateway.name=gateway-01 --set gateway.namespace=$ALB-infra --set slot=blue

curl http://$fqdn/ping
If we now install the same app in another namespace but this time with the canary flag we will configure a header based routing rule on the same fqdn which will allow us to test the same app by just providing the canary header.
kubectl create namespace $KUBERNETES_NAMESPACE-canary
kubectl label namespace calculator-canary shared-gateway-access=true

helm upgrade calculator $AZURE_CONTAINER_REGISTRY_NAME/multicalculator --namespace $KUBERNETES_NAMESPACE-canary --install --create-namespace --set replicaCount=2 --set image.frontendTag=$BUILD_BUILDNUMBER --set image.backendTag=$BUILD_BUILDNUMBER --set image.repository=$AZURE_CONTAINER_REGISTRY_URL --set gateway.enabled=true --set gateway.name=gateway-01 --set gateway.namespace=$ALB-infra --set slot=green --set canary=true
The resulting canary routing rule looks like this:
apiVersion: gateway.networking.k8s.io/v1
  kind: HTTPRoute
  metadata:
    annotations:
      meta.helm.sh/release-name: calculator
      meta.helm.sh/release-namespace: calculator-canary
    labels:
      app.kubernetes.io/instance: calculator
      app.kubernetes.io/managed-by: Helm
      app.kubernetes.io/version: 3.0.0
      helm.sh/chart: multicalculator-1.5.0
    name: calculator-multicalculator
    namespace: calculator-canary
  spec:
    parentRefs:
    - group: gateway.networking.k8s.io
      kind: Gateway
      name: gateway-01
      namespace: test-infra
    rules:
    - backendRefs:
      - kind: Service
        name: calculator-multicalculator-backend-svc
        port: 8080
        weight: 1
      matches:
      - headers:
        - name: slot
          type: Exact
          value: canary
        path:
          type: PathPrefix
          value: /
And if we now query the same fqdn with the right header we can see that we will get a response from our app in our canary namespace while the normal fqdn without the header still returns the same result.
curl -H "slot:canary" http://$fqdn/ping
{"response":"pong!","version":"blue - 3.0.0"}

curl http://$fqdn/ping
{"response":"pong!","version":"green - 3.0.0"}
That allows us to implement rolling blue/green with automatic rollback (check the scripts in the phoenix repo) with relatively few extra effort and no changes in our application architecture.
echo "removing canary flag from green slot"
helm upgrade calculator $AZURE_CONTAINER_REGISTRY_NAME/multicalculator --namespace $KUBERNETES_NAMESPACE-canary --install --create-namespace --set replicaCount=2 --set image.frontendTag=$BUILD_BUILDNUMBER --set image.backendTag=$BUILD_BUILDNUMBER --set image.repository=$AZURE_CONTAINER_REGISTRY_URL --set gateway.enabled=true --set gateway.name=gateway-01 --set gateway.namespace=$ALB-infra --set slot=green --set canary=false

echo "switching blue production deployment to canary slot"
helm upgrade calculator $AZURE_CONTAINER_REGISTRY_NAME/multicalculator --namespace $KUBERNETES_NAMESPACE --install --create-namespace --set replicaCount=2 --set image.frontendTag=$BUILD_BUILDNUMBER --set image.backendTag=$BUILD_BUILDNUMBER --set image.repository=$AZURE_CONTAINER_REGISTRY_URL --set gateway.enabled=true --set gateway.name=gateway-01 --set gateway.namespace=$ALB-infra --set slot=blue --set canary=true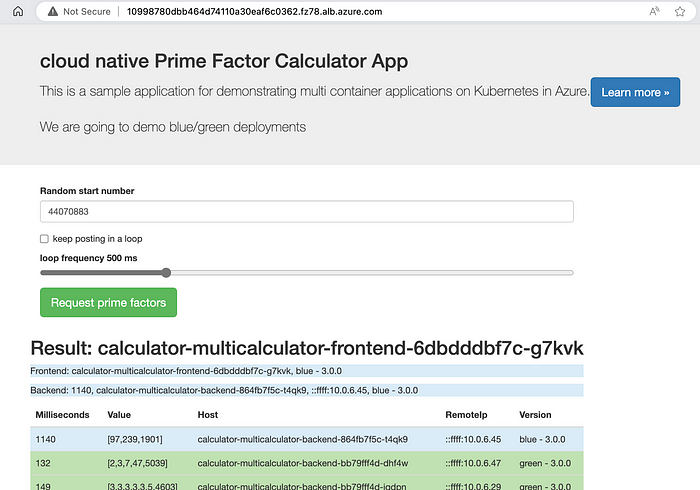
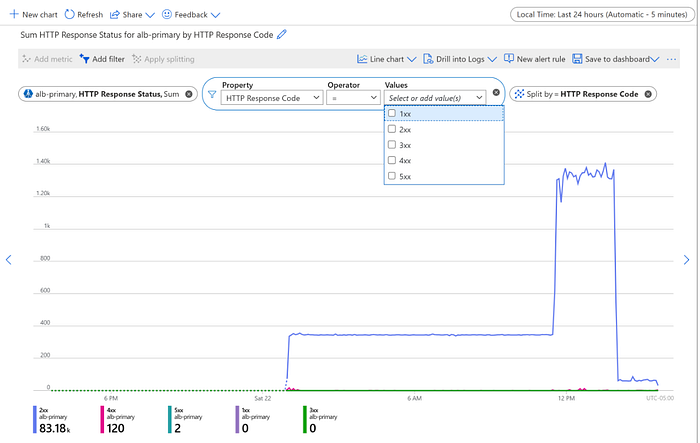
Particularly great is the availability of detailed metrics for the traffic coming through the Gateway Frontend and Proxies which can be broken down by backend service, http status and timeouts and provide good insights on how healthy the traffic flow is.
The last important aspect is about ensuring end-to-end encryption for the traffic which can be done both from client to Gateway and also from the Proxies to your application pods — which requires you to provide a secret with the certificate for each.
# Create gateway with listener on port 443 and attach a matching certificate
kubectl apply -f - <<EOF
apiVersion: gateway.networking.k8s.io/v1
kind: Gateway
metadata:
  name: gateway-01
  namespace: test-infra
  annotations:
    alb.networking.azure.io/alb-namespace: $ALB-infra
    alb.networking.azure.io/alb-name: $ALB
spec:
  gatewayClassName: azure-alb-external
  listeners:
  - name: https-listener
    port: 443
    protocol: HTTPS
    allowedRoutes:
      namespaces:
        from: Same
    tls:
      mode: Terminate
      certificateRefs:
      - kind : Secret
        group: ""
        name: frontend.com
EOF
To ensure that the proxies can connect to the TLS endpoint of you pods you need to also provide a matching certificate in the BackendTLSPolicy. More details in the official docs:
kubectl apply -f - <<EOF
apiVersion: alb.networking.azure.io/v1
kind: BackendTLSPolicy
metadata:
  name: mtls-app-tls-policy
  namespace: test-infra
spec:
  targetRef:
    group: ""
    kind: Service
    name: mtls-app
    namespace: test-infra
  default:
    sni: backend.com
    ports:
    - port: 443
    clientCertificateRef:
      name: gateway-client-cert
      group: ""
      kind: Secret
    verify:
      caCertificateRef:
        name: ca.bundle
        group: ""
        kind: Secret
      subjectAltName: backend.com
EOF
In the phoenix repo and in my earlier blog post you will find samples and guidance on how to automate the continuous blue/green deployment process. You will also notice that the failover and change times between deployments and backends is being adapted extremely fast which makes it very practical for switching back and forth.
Overall the new service has very promising capabilities, however there are a couple design limitations today (which are being worked on):
- Limitation of exactly 1 ALB per cluster, 5 frontend per ALB
- Only supporting Azure CNI in the backend cluster
- No multi region or multi cluster support
For final comparison between the new and the old offerings I wanted to update the table from the earlier blog post with the criteria that I consider relevant here:

I am very excited about the new service and hopefully this has made you curious to try it out by yourself.